ValuePicker

For one of my projects I was looking for a NumberPicker to give the user the opportunity to select a specific duration.  I found the great numberpicker 1.0.0 package from Marcin Szalek . NumberPicker is a custom widget designed for choosing an integer or decimal number by scrolling spinners.  While this widged worked like intended, I was in need for a more general approach, a picker, wherer the user can choose from a predefined set of values. So I decided to sepearate values from it’s visual appearance. You have to inititalize the widget with a List of text/value pairs  List<ValuePickerItem>.

For example a list of durations would look like this:

text value in seconds (in this case int)
“00:30” 30
“01:00” 60
“02:00” 120
“05:00” 300
“10:00” 600

ValuePicker is heavily inspered by NumberPicker and shares some code, so please check the LICENSE AGREEMENTS of NumberPicker 1.0.0 of the source before you use it.


import 'package:flutter/foundation.dart';
import 'package:flutter/material.dart';
import 'package:flutter/rendering.dart';


class ValuePickerItem {
  String text;
  dynamic value; 

  ValuePickerItem(this.text, this.value);
}


class ValuePicker extends StatefulWidget {

  final List<ValuePickerItem> itemList;
  final ValueChanged<num> onChanged;
  final int initialIndex;
  final double itemHeight;
  final double width;
  final int extraLines; 

  ValuePicker({
    Key key,
    @required this.itemList,
    @required this.initialIndex,
    @required this.onChanged,
    this.itemHeight = 50.0,
    this.width = 100.0,
    this.extraLines = 1,
  }) : 
    assert (itemList != null),
    assert (initialIndex != null),
    assert (onChanged != null),
    super(key: key);


  @override
  ValuePickerState createState() {
    return new ValuePickerState();
  }
}

class ValuePickerState extends State<ValuePicker> {

  int _currentIndex; 
  int _itemCount;
  int _listItemCount;
  double _listViewHeight;

  ScrollController _scrollController;
  TextStyle _defaultStyle;
  TextStyle _selectedStyle;


  animateToIndex(int index) {
    _animate(_scrollController, index * widget.itemHeight);
  }


  _animate(ScrollController scrollController, double value) {
    scrollController.animateTo(value, duration: Duration(seconds: 1), curve: ElasticOutCurve());
  }


  bool _userStoppedScrolling(Notification notification, ScrollController scrollController) {
    return notification is UserScrollNotification &&
        notification.direction == ScrollDirection.idle &&
        scrollController.position.activity is! HoldScrollActivity;
  }


  bool _onIndexNotification(Notification notification) {
    if (notification is ScrollNotification) {
      int newIndex = (notification.metrics.pixels / widget.itemHeight).round() + widget.extraLines;
      if (_userStoppedScrolling(notification, _scrollController)) animateToIndex(newIndex - widget.extraLines);
      if (newIndex != _currentIndex) {
        setState(() {
          _currentIndex = newIndex;
        });
        widget.onChanged(_currentIndex - widget.extraLines);
      }
    }
    return true;
  }


  @override
  void initState() {
    _currentIndex = widget.initialIndex + widget.extraLines;
    _listViewHeight = widget.itemHeight * (widget.extraLines * 2 + 1);
    _itemCount = widget.itemList.length;
    _listItemCount = _itemCount + widget.extraLines * 2;
    _scrollController = ScrollController( initialScrollOffset: ((_currentIndex - widget.extraLines) * widget.itemHeight).toDouble());
    super.initState();
  }
  
  ///main widget
  @override
  Widget build(BuildContext context) {
    _defaultStyle = Theme.of(context).textTheme.body1;
    _selectedStyle = Theme.of(context).textTheme.headline.copyWith(color: Theme.of(context).accentColor);
    return _buildListView();
  }


  Widget _buildItem(BuildContext context, int index) {
    if ( index < widget.extraLines || index >= (_listItemCount - widget.extraLines)) {
      return  Container();
    } else {
      String value = widget.itemList[index - widget.extraLines].text;
      final TextStyle itemStyle = (index == _currentIndex ? _selectedStyle : _defaultStyle);
      return Center( child: Text(value, style: itemStyle));
    }    
  }


  Widget _buildListView() {
    return NotificationListener(
      child: Container(
        height: _listViewHeight,
        width: widget.width,
        child: ListView.builder(
          controller: _scrollController,
          itemExtent: widget.itemHeight,
          itemCount: _listItemCount,
          itemBuilder: _buildItem,
        ),
      ),
      onNotification: _onIndexNotification,
    );
  }
}


Usage

...

List<ValuePickerItem> _durationList = List<ValuePickerItem>();
_durationList.add(ValuePickerItem("00:30", 30));
_durationList.add(ValuePickerItem("01:00", 60));
_durationList.add(ValuePickerItem("02:00", 120));
_durationList.add(ValuePickerItem("05:00", 300));
_durationList.add(ValuePickerItem("10:00", 600));

int _pickerIndex = 2;
...

ValuePicker( 
   itemList: _durationList  , 
   initialIndex: _pickerIndex ,
   onChanged: (newIndex) {
     _pickerIndex = _durationList[newIndex].value;
   },
   extraLines: 2,
   width: 60,
 ),

This widget works fine for me but is not testet on different devices.

Flutter Textfield – How to …

In this a article I want to provide some solutions for problems I was facing, when I started to use the Flutter™ TextField Widget for the first time.

Use the different Types of Labels

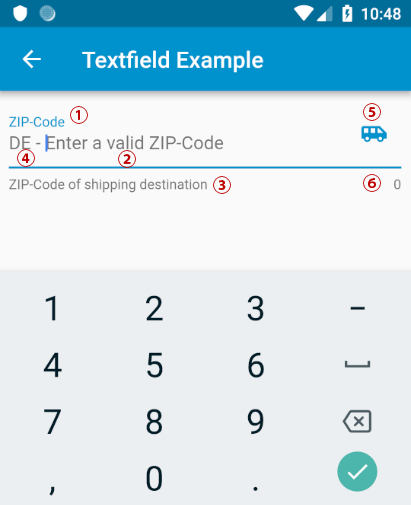
Textfields are able to display labels in a variety of different areas by assigning a InputDecoration  object to the decoration property. Here are some examples:

  1. labelText: Text that describes the input field. When the input field is empty and unfocused, the label is displayed on top of the input field.
  2. hintText: Text that suggests what sort of input the field accepts. Displayed on top of the input child when the input isEmpty and either (a) labelText is null or (b) the input has the focus.
  3. helperText and errorText: Text that provides context about the input child’s value, such as how the value will be used. If non-null, the text is displayed below the input child, in the same location as errorText. If a non-null errorText value is specified then the helper text is not shown.
  4. prefixText or prefixIcon: Optional text prefix to place on the line before the input. Prefix is not returned as part of the input. In this example a 2 digit ISO country code.
  5. suffixIcon or suffixText: An icon that that appears after the input and suffixText and within the decoration’s container.
  6. counterText: Optional text to place below the line as a character count.

The implementation of the example would look like:

TextField(
   controller: _textController,
   keyboardType: TextInputType.number,

   decoration: InputDecoration(            
     hintText: 'Enter a valid ZIP-Code',
     errorText: _hasInputError ? "ZIP-Code is too short" : null,
     counterText: _textController.text.length.toString(),
     helperText: "ZIP-Code of shipping destination",
     labelText: "ZIP-Code",
     prefixText: "DE - ",
     suffixIcon: Icon(Icons.airport_shuttle), 
   ),
),

Continue …

ImplicitlyAnimatedWidget – The simple way to animate Widgets

It can be a little bit rough to learn , how animations work in Flutter projects. Fortunately Flutter provides some very handy widgets which are animated out of the box when a property is changed which is called “implicit animation”:

However, it would be cool to create custom widgets with this capabilities.  All the widgets listed above are implementing the ImplicitlyAnimatedWidget class, so I tried to do the same: After some struggle I found a  codesnippet on Stackoverflow which helped a lot.

My goal was to create an implicitily animated FloatingActionButton where thebackgroundColor is changed smoothly when a new color is assigned:

import 'package:flutter/material.dart';

class AnimatedFab extends ImplicitlyAnimatedWidget {
  final Color foregroundColor;
  final Color backgroundColor;
  final Function onPressed;
  final Widget child;
  final String tooltip;

  AnimatedFab({
    Key key,
    @required this.onPressed,
    this.foregroundColor = Colors.white,
    this.tooltip = '',
    @required this.backgroundColor,
    @required Duration duration,
    this.child,
    Curve curve = Curves.linear
  }) : super(duration: duration, curve: curve, key: key);

  @override
  ImplicitlyAnimatedWidgetState<ImplicitlyAnimatedWidget> createState() => _AnimatedFabState();
}

class _AnimatedFabState extends AnimatedWidgetBaseState<AnimatedFab> {

  ColorTween _colorTween;

  @override
  void forEachTween(TweenVisitor visitor) {
    _colorTween = visitor(_colorTween, widget.backgroundColor, (dynamic value) => ColorTween(begin: value));
  }

  @override
  Widget build(BuildContext context) {
    return FloatingActionButton(
      onPressed: widget.onPressed,
      tooltip: widget.tooltip,
      backgroundColor: _colorTween.evaluate(animation),
      foregroundColor: widget.foregroundColor,
      child: widget.child,
    );
  }


}

Continue …

Building a Custom Component for Android with Kotlin or QML – A Comparison

When creating UIs it’s a common task to build your own set of reusable UI Components, if you dont want to rely on the built-in set of the framework.
I was very curious how this is done in native Android app-development and how this fancy new language Kotlin works in this context.
A quick search brought me to this excellent tutorial from Eley “Building Custom Component with Kotlin”.

So here is the goal:

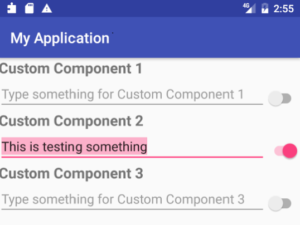
Create a reusable component which contains a label, an editable textline and a switch, formatted as you can see in the picture below (original picture slightly adjusted).

I will show the lines of code you need to achieve this goal with Native Android + Kotlin on the one hand and Android -styled QML on the other hand.

Continue …

Scalable Icon Button

Scalable Icon Button

In the previous post we have seen, how to create icons which scale properly. Additionally I have added a scalingFactor property to the IconSVG:

//IconSVG.qml
import QtQuick 2.0
import QtQuick.Window 2.2
import QtGraphicalEffects 1.0

Image {
    id: root

    property alias color: colorOverlay.color
    property int size: 24  // default
    property real scalingFactor: 1

    sourceSize.width: size * scalingFactor
    sourceSize.height: size * scalingFactor

    ColorOverlay {
        id: colorOverlay
        anchors.fill: root
        source: root
        color: "#000000"
    }
}

Now let’s see, how this can be useful in a real usecase.

Continue …

Scalable SVG Icons

It’s a lot of work to provide icons for mobile devices, because of the large number of different formfactors and screen pixel-densities.

Android is using the following set of values:

Name DPI Scaling Factor Default Icon Size
ldpi (low) ~120dpi 0.7 18 x 18
mdpi (medium) ~160dpi 1.0 24 x 24
hdpi (high) ~240dpi 1.5 36 x 36
xhdpi (extra-high) ~320dpi 2.0 48 x 48
xxhdpi (extra-extra-high) ~480dpi 3.0 72 x 72
xxxhdpi (extra-extra-extra-high) ~640dpi 4.0 96 x 96

Source: http://developer.android.com/guide/practices/screens_support.html

To ensure that you get sharp icon shapes you need to provide different icon-files (usually png-files) for each DPI class.

Continue …

Progress Circle with QML and Canvas

progress-circle

Are you looking for an easy way to implement a fully customizable, nicely animated progress circle in QML?

This is the way to go:

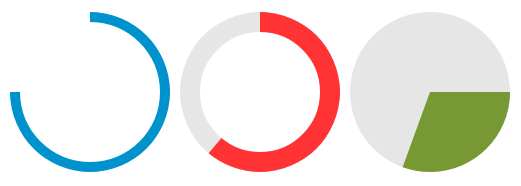
Use a canvas control to paint the arc and a full circle as a background. You can set the size of the control, colort and the start and end angle of the arc. If you change the angles, the change will be animated – of course, you can turn the animation off. If isPie set to true, a pie segment is painted instead of an animation.

Continue …